
Unlock the Secrets of Image Transfer to Elevate Your Mixed Media Artwork
- Dec 22, 2023
- 4 min read
Updated: May 1, 2024
Hey there! This latest mixed-media background tutorial walks you through a fun and easy way to create unique mixed-media backgrounds with a fun and easy image transfer technique.
All you need is a laser-printed image (learn why) of an interesting background or pattern and a bit of Citrisolv or nail polish remover.
The technique is super fun as you watch the design go from the printed image onto your chosen surface. I have another tutorial on how to transfer newspaper print onto another surface you can check out.

I think when most folks think about image transfers, they imagine a single image as an object for their work.
This idea is unique. Instead of transferring just an image of an object, you transfer a large pattern to cover the entire background.
But first, you might have some questions about what image transfers are…
What are image transfers in mixed media art?
Image transfers in mixed media art is an exciting technique that allows you to add a printed photograph or magazine image into your artwork.
Image transfers involve transferring a printed image onto another surface, such as paper, fabric, or canvas, to create a layered, intricate design.
This method can add depth, texture, and themed elements to a piece of art, making it a fun choice for people who want to blend different media and techniques.
The process typically uses a transfer medium like Citrisolv, nail polish remover, or a transfer medium using laser printers.
The mediums release the ink from a printed image onto the new surface, creating a duplicate of the image on the surface.

Printer paper
Background surface
You might be asking…
What is Citrisolve?
Citrisolv is a natural solvent that breaks down the toner ink from a laser-printed image without damaging the transfer surface. It can be purchased on Amazon.
Citrisolv loosens the ink from the printed material, allowing it to be pressed and transferred onto another surface, such as canvas, wood, or fabric.
It creates clear, detailed transfers of the original image.
Moreover, Citrisolv is a good choice because it is made from renewable resources and is biodegradable.
Step 1
Do an image search online and choose an image that you think would be a good choice for the background of the artwork you're doing.
If you have a laser printer that can print in color, that's great. If not, a black-and-white design will also work fabulously.
This is the image I chose:

Step 2
Copy the image and print it with a laser printer.
Why are laser printers better for image transfers?
You can use any laser printer for image transfers in mixed media projects. If you have a laser printer that can print in color, that's great. If not, a black-and-white design will also work fabulously.
Laser printers are preferable for this technique because they use toner, which is a powder, rather than the liquid ink used by inkjet printers.
The toner contains plastic components that respond to solvents used for the transfer, such as Citrisolv or nail polish remover.
This response allows the image to be released onto a different surface.
However, it's important to use a freshly printed image, as the toner is more likely to transfer when it hasn't fully set into the paper.
Step 3
Tape the printed background to the surface you want to transfer the image to.
I used a simple painted background I had in my stash as the surface to transfer to.

Step 4
Cut a piece of felt or fold a paper towel so it's pretty thick, and put it over an open bottle of Citrisolve or nail polish remover with acetone.

Is nail polish remover a safe alternative for citrisolv in image transfers?
Nail polish remover can be a viable alternative for Citrisolv in image transfers, as it often contains acetone, which is a solvent that can dissolve printer toner.
However, nail polish remover can be more aggressive than Citrisolv. While it can certainly transfer an image, it may also be more likely to dissolve any paints or mediums on the surface you're transferring to if they are not fully dried or are sensitive to solvents.
Additionally, because nail polish removers vary in their ingredients, with some being acetone-free, it's crucial to choose one that contains acetone for the transfer to be successful.
Nail polish can also have a harsh smell, so you might want to do this step outside.
Step 5
Rub the piece of felt with the Citrisolve on it over a section of the backside of your printed image.

As you can see, the Citrisolve saturates the paper, allowing you to see the image.
Depending on how big the surface and design you are transferring, you might want to do only a section at a time so you can complete the next step quickly…
Step 5
Use a tool to burnish the image onto your background. You do this by rubbing a flat tool with some pressure over it.

Note: I made a few of these and noticed that if I burnished too hard or maybe used too much Citrisolve when doing this step, I pushed some ink around where it wasn't in the image. I thought it made it look even more interesting, but it's something to be aware of.
Keep doing these steps till you've covered the whole area.
Step 6
When you're done burnishing, gently remove the tape and lift up a corner of the printed paper to see if the image was transferred.

If the image is transferred successfully, remove the printed image completely and let it dry, as the ink will still be wet.

When dry:

I also used this image…

to make this background:

I made this artist trading card using it:

Cute, huh?
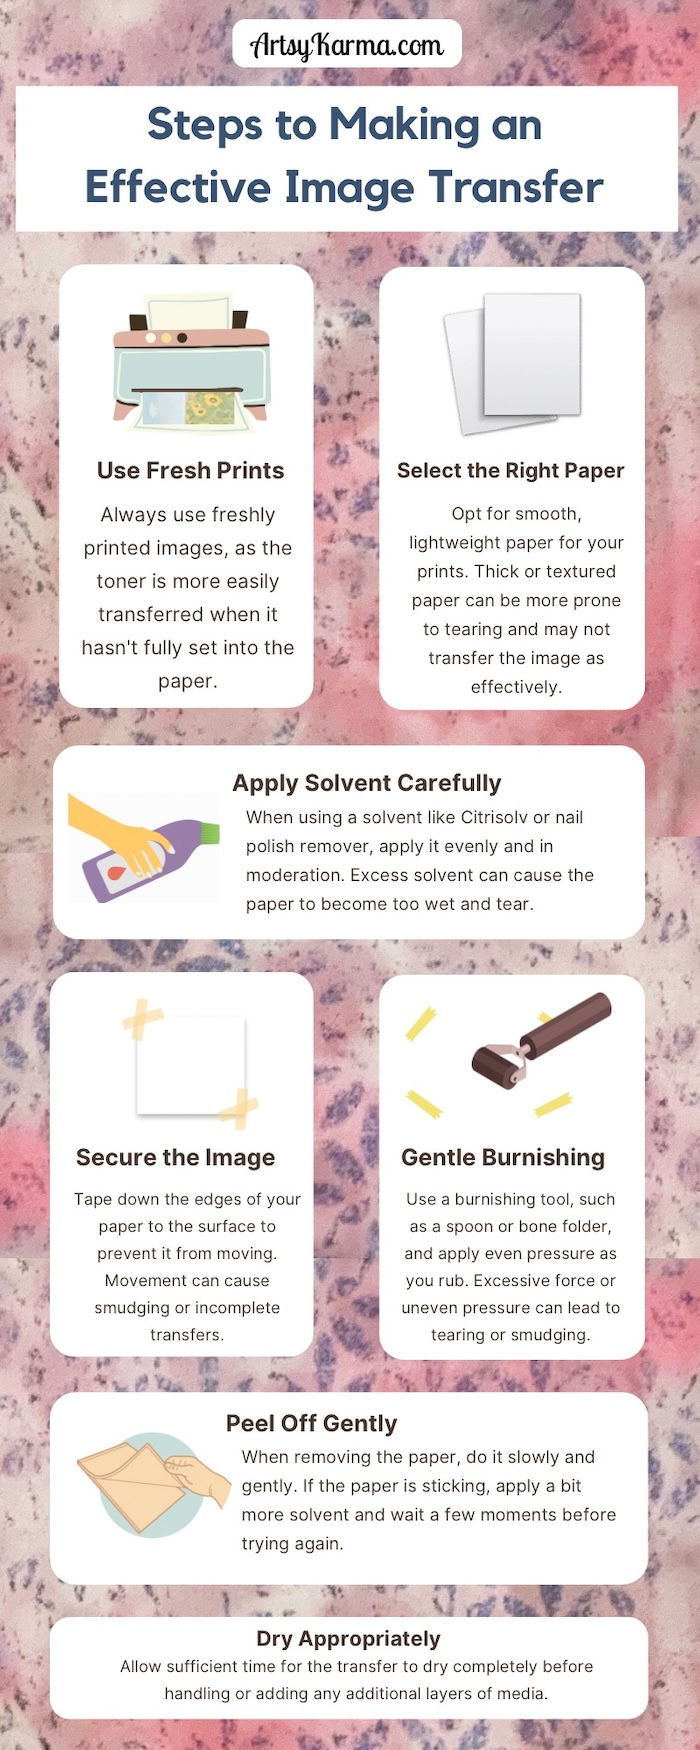
Here is a graphic of all the steps:
So, grab your nail polish remover or order some Citrisolv and try out this fun and magical technique.


Comments