
Button Art 101: How to Make a Beautiful Canvas Piece
- Oct 24, 2020
- 3 min read
Updated: Jun 21, 2023
Learn how to make beautiful, colorful canvas paintings with just a few spare buttons. With easy-to-follow instructions and helpful tips, you can create a unique masterpiece in no time. Unlock your creative potential and get started today!
Check out my button and bead collage coaster project and button mobile too.

Get this project in PDF towards the bottom!

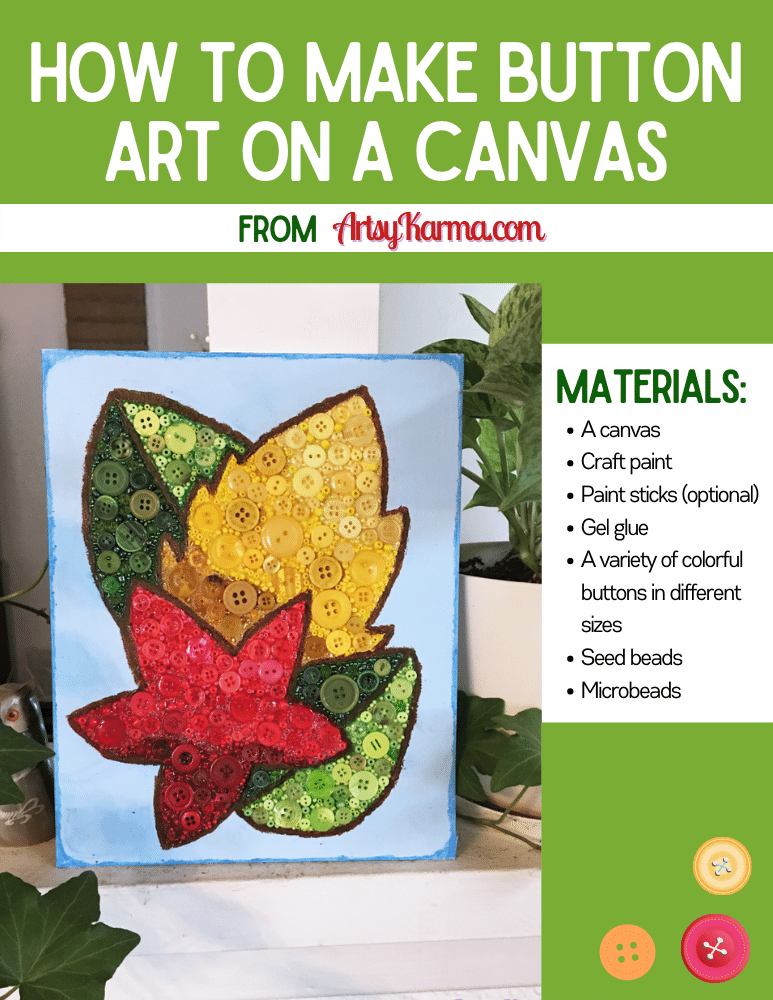
A canvas
Paint sticks (optional)
A variety of colorful buttons in different sizes
You can work with what you have!
Work with the color buttons that you have to decide the topic of your painting.
Get extra crafty by adding beads as well.
First, you might be wondering...
What is the best glue for buttons on canvas?
When it comes to attaching buttons to canvas for creating button art, using the right adhesive is crucial. While there are several options available, one of the most recommended glues is gel glue, like Aleene's clear gel tacky glue.
Gel glue, also known as craft glue or fabric glue, is an excellent choice for adhering buttons to canvas due to its unique properties. Here's why gel glue is considered the best option for this project:
Versatile Bonding: Gel glue is designed to bond different materials together, making it suitable for securing buttons onto canvas surfaces. It forms a strong and durable bond that can withstand the test of time.
Easy Application: Gel glue typically comes in a squeeze tube or a bottle with a precision applicator, allowing you to control the amount of adhesive you apply. This makes it easy to place the glue precisely on the back of each button, ensuring a secure attachment.
Minimal Mess: Gel glue is thicker in consistency compared to liquid white glue, which reduces the chances of it spreading beyond the button's edges. This minimizes the mess and ensures a clean-looking finished product.
Slower Drying: Gel glue takes a little bit longer to dry than regular craft glue. This is important for this project as it means you have enough time to add all your elements and move them around to the perfect placement.
Fabric-Friendly: Since gel glue is designed for fabric applications, it works exceptionally well on canvas. It adheres to the material securely without causing damage or leaving behind unsightly marks.
By using gel glue, you can confidently create stunning button art on canvas, transforming it into a unique and visually appealing piece of artwork.
Step 1:
Choose a design and draw it in pencil on your canvas.

Step 2:
Paint the background.
You always want to start with the background so your main objects are painted over. Makes sense.

Step 3:
Start painting the rest of your design.
Keep this part simple. You will be covering it up with the same colored buttons and beads, so just plain, solid colors.

I wasn't worried about brush strokes showing since they were soon going to be hidden.

Step 4:
Using a paint stick (or just a brush with paint), outline the different shapes in your design.
This was important in defining the shapes and breaking up the colored buttons.

Step 5:
Go thru your buttons and group the colors you need.

Step 6:
Squeeze a good layer of gel glue over the space you plan to do first. This should be one color grouping.
Using gel glue is super important because it takes much longer to dry, so you won't have to keep adding glue while adding layers of buttons and beads.


Step 7:
Add your bigger buttons, leaving room for the smaller ones and beads.

Then add the smaller ones, still leaving some room.

Step 8:
Add seed beads between the buttons. Bigger ones first, then smaller if you have two sizes.


Step 9:
If you happen to have microbeads, add those too.

Step 10:
Let the section you just worked on dry before going to the next.
Step 11:
Between sections, leave the outline you created showing.

And should your beads escape the outline and go over, gently push them back with your finger or another tool.

Step 12:
As a final touch, outline the whole canvas with a paint stick (or a paintbrush and paint.)

Now add it to your fall decor or wall decor all the time because it's awesome 😄

If you love this project and still have more buttons left, check out my Button Mobile Craft Project button and bead collage coaster project too.
Get the Button Art on Canvas tutorial as a PDF when you subscribe!
Don't forget to check out all my adult craft tutorials!

Click on the images below to see them on Pinterest, and follow me too!


Comments