
Turn a Wooden Jigsaw Puzzle into Your Own Painted Masterpiece
- Heather McClelland
- Sep 24, 2022
- 4 min read
Updated: Jan 5
Use a children's wooden puzzle as the canvas for your next painting project. With simple images, you can create unique puzzle art for your home or as a gift.
It's not as hard as it may look, as each design uses only basic silhouette shapes. In this tutorial, I'll show you just how simple the process is.

Using a wooden puzzle without a ton of pieces makes this project a more simple and doable art craft. And using a puzzle that comes in a frame gives the painting a nice finished look. See also my glitter painting tutorial.
And as you can see, painting each puzzle piece a different color keeps it looking like a puzzle.
Using a rainbow of bright colors against the black really makes the pieces pop.
How do you paint a wooden puzzle?
To paint a wooden puzzle, start by removing all the pieces out of the wooden frame that they usually come with. You'll want to keep the pieces connected together to make it easier.
To cover the children's picture on the puzzle, allowing you to paint the pieces however you want, spray the connected puzzle pieces with a white primer. The primer will allow the new paint to stick to the pieces.
Throughout the process, you'll want to avoid getting too much paint on the sides of the puzzle pieces as you paint each one. Getting too much paint on the sides makes it hard to get the puzzle pieces back together at the end.
One of the many thrills I get from doing art is repurposing items around the house, like puzzles.
These are some other tutorials I've made that repurpose items:

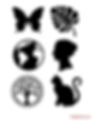
Silhouette images to trace or copy - template at the bottom

cat puzzle instructions
Step 1
Remove the nine pieces, still connected, from the puzzle's frame and spray them with the white primer.

Step 2
Print out a graphic of a simple silhouette (template at the end of the tutorials) in the size you need to fit in the puzzle.

Step 3
Cut out a piece of tracing paper big enough to fit under the printed silhouette graphic and place it on the still-connected puzzle.

Step 4
Trace the outline of the silhouette image over the tracing paper and puzzle.


Step 5
Decide which colors you want to paint within the silhouette.

Then separate the pieces and start coloring the parts within your silhouette lines with paint pens o craft paint.

Go around the sides of the puzzle piece and just a little under.
You don't want too much paint on the sides; otherwise, the puzzle pieces won't fit back together.

Paint each piece within the silhouette shape a different color or in a combination that the color of one piece contrasts with the pieces next to it.

Put the puzzle together to make sure it all lines up right:

Step 6
Paint the rest of each puzzle piece black.


Now put it together and spray a little acrylic sealer on it.

Tree puzzle instructions
Step 1
Paint each piece a different rainbow color.

Step 2
Put the puzzle back together once the paints dry.

Step 3
Decide what silhouette design you're going to use.
I turned back to the internet and found this tree I wanted to use (download the template at the end of the tutorial):

Step 4
Use the tracing paper again, or you can eyeball it and draw it yourself.


Step 4
Go around the black design with a fine point white paint pen.


Step 5
Hit it with the acrylic sealer.

Now, bask in the glory of your art!

Below is a template for you to use if you get 6-inch puzzles, as I did. I added four more images I thought would work well for this project.
Download the image by clicking on it or download a PDF version under the image.
While I showed you how to use small kids' puzzles in this project, you can use any puzzle that delights you and paint it any way that delights you, too 😄.
A while back, I went through a phase of using mixed media and collage elements on single puzzle pieces, otherwise known as altered puzzle pieces. Put a magnet on the back, and they make a fun and interesting gift.
Visit Cut Out and Keep for a quick tutorial on how to alter a puzzle piece.

I even, a couple of times, altered an entire puzzle and put it back together with every piece altered differently:

Now it's your turn to make beautiful puzzle art.
But before you do, please take a look at all my colorful adult craft projects.
If you loved this project, please share ❤️❤️❤️


